Tired of dragging hoses around? Learn how to set up a drip irrigation system that saves water, time, and keeps your plants thriving without the guesswork.
- May 15, 2026
Why Your Garden is Thirsty (and Your Wallet is Too)
You probably spend more time watering your garden than you realize. The average homeowner uses about 10,000 gallons of water per year on outdoor landscaping, according to the EPA, and a staggering 50% of that is wasted due to evaporation, runoff, or overwatering. If you've ever stood outside with a hose, moving it from plant to plant, you know the drill: you forget a corner, drown another, and end up with a muddy mess. That's where drip irrigation comes in.
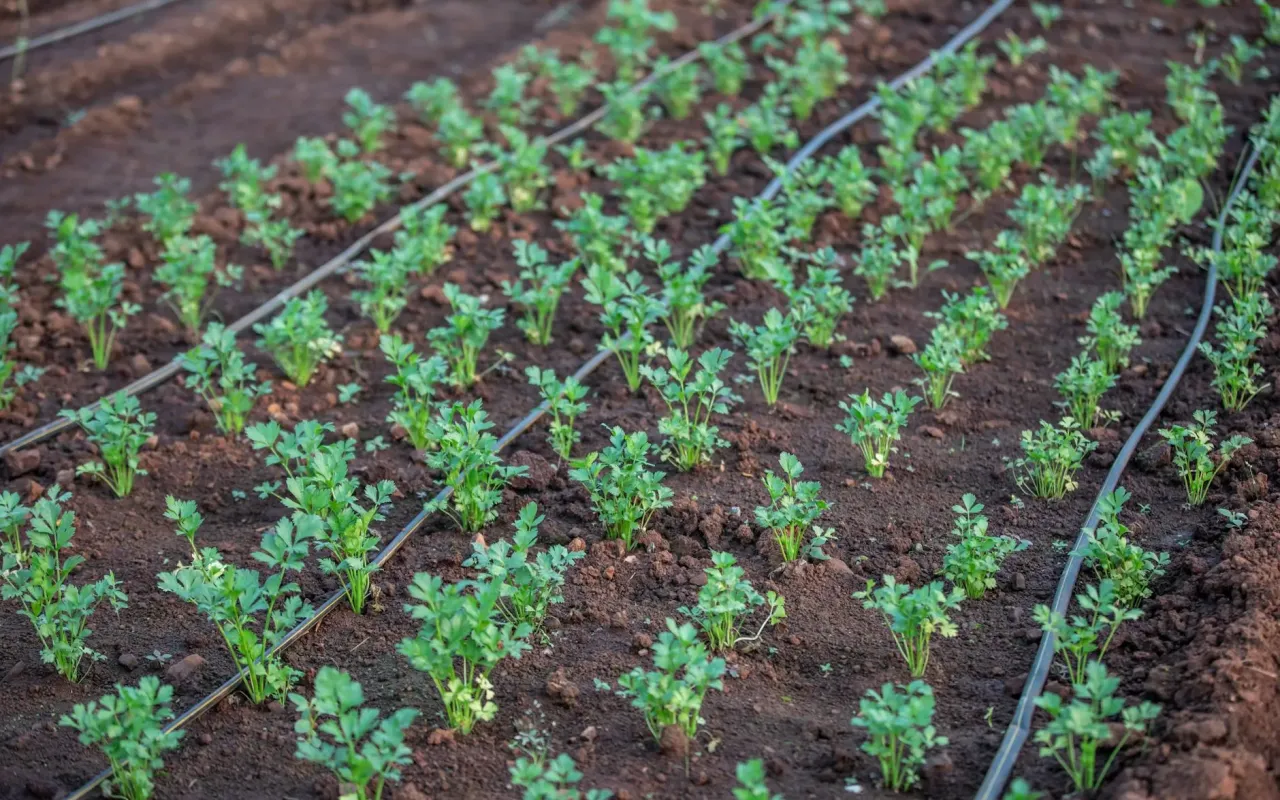
Drip irrigation delivers water directly to the root zone of each plant through a network of tubes and emitters. It's not just for fancy vineyards or commercial farms—it's a practical upgrade for your backyard vegetable patch, flower beds, or even container plants. The best part? Once it's set up, you'll spend less time watering and more time actually enjoying your garden.
The real kicker is the water savings. Studies show drip systems can reduce water usage by 30 to 50% compared to sprinklers. That means lower utility bills and less guilt about running the hose during a dry spell. But setting one up isn't rocket science—it's more like assembling a Lego set with a purpose. Let's walk through the process so you can stop guessing and start growing.
What You Actually Need (No Fancy Tools Required)
You don't need a degree in plumbing or a truck full of parts to get started. A basic drip irrigation system requires a handful of components that you can find at any hardware store or online. The core items include a pressure regulator, a backflow preventer, a filter, mainline tubing (usually 1/2-inch or 5/8-inch), smaller 1/4-inch distribution tubing, and emitters (drippers, sprayers, or soaker lines). You'll also need connectors, stakes, and a timer if you want automation.
Here's the honest truth: buying a pre-assembled kit can save you headaches if you're a beginner. Brands like Rain Bird or Orbit sell starter kits for under $50 that include everything except the timer. But if you're retrofitting an existing garden or have an irregular layout, buying components separately gives you more flexibility. For a typical 100-square-foot garden bed, expect to spend $60 to $120 total, which pays for itself in water savings within a season or two.
One often-overlooked item is the pressure regulator. Most home water systems run at 40 to 60 PSI, but drip emitters work best at 20 to 30 PSI. Without a regulator, you'll blow out emitters or get uneven watering. Also, don't skip the filter—even small particles can clog those tiny dripper holes, turning your system into a useless string of plastic. A simple Y-filter or disc filter costs about $10 and saves you from constant frustration.
Choosing the Right Emitters for Your Plants
Not all plants drink the same amount. Tomatoes and peppers need about 1 to 2 gallons per week, while succulents might only need a quarter of that. Emitters come in different flow rates: 0.5, 1, or 2 gallons per hour (GPH). For most vegetables and flowers, 1 GPH emitters spaced 12 to 18 inches apart work well. For larger plants like shrubs or small trees, go with 2 GPH emitters or use a drip line with built-in emitters every 12 inches.
If you're watering a dense bed of annuals or ground cover, consider soaker hoses or drip tape instead of individual emitters. Soaker hoses seep water along their entire length, which is great for rows of lettuce or herbs. Just remember: soaker hoses have higher flow rates and can waste water if placed on slopes, so test them before committing. The key is matching the emitter type to your plant's root depth and spacing—no point in watering the soil between plants.
Mapping Your Garden Layout Like a Pro
Before you cut any tubing, grab a notebook and sketch your garden. Measure the length and width of each bed, and note where your water source is located (usually an outdoor spigot). Mark the location of each plant, especially perennials and trees, because they'll need dedicated emitters. Annuals can be watered via drip lines, but perennials often need specific placement to avoid over- or under-watering.
The golden rule is to keep mainline runs under 200 feet to maintain consistent pressure. If your garden is larger, you can split the system into zones using a manifold or multiple timers. For example, a front yard flower bed and a backyard vegetable patch might need separate zones because they have different sun exposure and watering needs. Each zone should have its own valve or timer so you can adjust schedules independently.
Don't forget to account for elevation changes. Water flows downhill, so if your garden slopes, the lower plants will get more water than the higher ones. To compensate, use pressure-compensating emitters (PC emitters) that deliver a consistent flow regardless of elevation. They cost a few cents more per emitter but are worth every penny for hillside gardens. Mark these on your map so you buy the right parts.
Calculating Your Flow Rate and Pressure
Your spigot has a limited flow rate, usually between 5 and 10 gallons per minute (GPM). To check yours, time how long it takes to fill a 5-gallon bucket from your outdoor tap. Divide 5 by the number of seconds, then multiply by 60. For example, if it takes 30 seconds: 5/30 = 0.167, times 60 = 10 GPM. This tells you how many emitters you can run at once. A typical 1 GPH emitter uses 0.017 GPM, so you can run about 588 emitters on a 10 GPM line—but realistically, pressure drops after 100 emitters.
Pressure is equally important. Use a pressure gauge (under $10 at hardware stores) to measure your static pressure at the spigot. If it's above 60 PSI, install a pressure regulator set to 30 PSI. If it's below 20 PSI, you'll need a booster pump or a low-pressure drip system designed for gravity-fed setups. Most suburban homes fall in the 40 to 60 PSI range, so a regulator is non-negotiable. A quick test saves you from buying parts that won't work.
Assembling the System Without Losing Your Mind
Start by connecting the backflow preventer to your spigot. This device keeps dirty water from siphoning back into your home's drinking water—it's required by code in many areas and costs about $15. Next, attach the filter, then the pressure regulator, and finally the timer if you're using one. Then connect the mainline tubing using a compression fitting or a quick-connect adapter. Run the mainline along the edge of your garden bed, securing it with landscape stakes every 3 to 4 feet.
Now comes the fun part: punching holes. Use a hole punch tool (included in most kits) to poke holes in the mainline where you want emitters. Insert a 1/4-inch barbed connector, then attach your distribution tubing. Run this tubing to each plant, and insert an emitter at the end. For a clean look, bury the 1/4-inch tubing under mulch or soil, but leave the emitter exposed at the base of the plant. Secure everything with stakes to prevent the tubing from shifting in the wind.
One practical tip: leave a few extra feet of tubing at the end of each run. This allows you to move emitters as plants grow or if you decide to rearrange your garden. Also, cap the ends of the mainline with a flush cap or a simple plug. Drip systems need occasional flushing to remove sediment, so having a removable cap makes maintenance a breeze. Test the system by turning on the water for 5 minutes and checking for leaks or dry spots.
Adding a Timer for True Set-and-Forget
If you're like most people, you'll forget to water at some point. A digital timer that screws onto your spigot costs $20 to $40 and lets you set watering schedules by day and duration. For most gardens, watering deeply twice a week is better than a light daily sprinkle. Set the timer to run for 20 to 30 minutes per session, depending on your soil type. Clay soil holds water longer, so adjust to 15 minutes; sandy soil drains fast, so go 30 minutes.
Some timers have rain sensors or Wi-Fi connectivity, allowing you to override schedules from your phone. While fancy, a basic mechanical timer works just fine for most people. The real benefit is consistency—plants thrive on regular moisture, and a timer ensures they get it even when you're on vacation or stuck at work. Pair it with a moisture sensor (around $15) that pauses watering when the soil is already wet, and you've got a system that's smarter than most gardeners.
Common Mistakes That Will Ruin Your System (and How to Avoid Them)
The biggest mistake beginners make is using too many emitters on one line. Each emitter reduces pressure, and if you exceed the recommended number for your tubing diameter, the last emitters will barely dribble. A 1/2-inch mainline can handle about 200 GPH total, which translates to 200 emitters at 1 GPH each. But if you have long runs, keep it under 150 emitters to maintain even flow. Use a flow calculator app or manufacturer charts to be precise.
Another frequent error is placing emitters too close to plant stems. Watering directly at the stem can cause rot and fungal diseases. Instead, position the emitter 2 to 4 inches away from the stem, at the edge of the root zone. For established plants, the roots extend outward, so watering the perimeter is more effective. Also, avoid running drip lines across walkways or paths where they can be tripped over or damaged—use a riser or bury the tubing under a paver.
Finally, don't forget about winterization. If you live in a climate with freezing temperatures, water left in the tubing can expand and crack the plastic. Before the first frost, disconnect the system, drain all water, and store the timer indoors. Blow out the lines with a compressor if possible, or simply lift and shake them to remove water. A little prep now saves you from buying a whole new system next spring. Trust me, I learned this the hard way.
Maintaining Your System for Years of Reliable Service
Drip irrigation systems are low-maintenance but not no-maintenance. Every month during the growing season, check emitters for clogs by looking for dry spots around plants. If an emitter is clogged, unscrew it and soak it in vinegar for an hour to dissolve mineral deposits. For stubborn clogs, replace the emitter—they cost pennies each. Also, inspect the filter every few weeks and rinse it if it looks dirty. A clogged filter reduces pressure across the whole system.
At the end of the season, flush the lines by removing the end caps and running water for a minute. This clears out sediment and debris that accumulate over time. If you use a timer, replace the batteries annually (or use a rechargeable model). For systems with multiple zones, test each zone separately to ensure valves are working. A small investment of 10 minutes per month keeps your system running efficiently for 5 to 10 years.
One final pro tip: add a fertilizer injector to your system. These devices, costing $20 to $50, mix liquid fertilizer into the water as it flows. This delivers nutrients directly to the roots, reducing waste and boosting plant growth. Use a balanced liquid fertilizer at half strength every two weeks during the growing season. Your plants will thank you with bigger yields and greener leaves, and you'll wonder why you didn't set up drip irrigation sooner.